Pages

Saturday, December 31, 2011

Winter Wonderland Download - Happy New Year

Our gift to you...
Click on the image and them save.

Wishing you a winter wonderland filled with peaceful moments.

Happy New Year from all of us at The Creative Patch.

Sheila

Thursday, December 29, 2011

Trash To Treasure - Recipe/Photo Holder

Do you love quick and easy projects made from things normally thrown away? 
Here is one that I hope you enjoy...
Supplies Needed:
Old spine from vintage photo album
Exacto Knife
Buttons & Floss
Chipboard
Recipe Cards or Photos
Lace to embellish
After trimming the album pages from the album, cut the spine from the back of the album with an Exacto Knife.
Measure the the width and length of the spine and cut a piece of chipboard.
Glue the chipboard to each flap of the spine...
creating a half circle.
Then add floss to buttons and glue buttons to each end of the album spine.
Add lace to recipe card and stick in the album spine for an easy recipe/photo holder.
I can't wait to make a few more of these.
Wishing you a creative day..

Saturday, December 24, 2011

Merry Christmas

From our Patch to yours, wishing you a very Merry Christmas.

and all the wonderful
Guest Gardener's!

Thursday, December 22, 2011

a little something......


I am always in need of extra little gifts during Christmas time....and I love giving handmade treasures that your special recipients can use throughout the home. I love burning candles....but thought I would whip up something a bit different than the norm and decided upon some fragrance jelly jars. These are soooo easy peasy to whip up....a perfect craft to do with the kiddos as a last minute gift.

You will need.....

clean jelly jars 
4 packets unflavored gelatin 
food coloring (if desired)
fragrance or essential oils
water
salt 


First start by getting your glass jars ready for the mixture. I had some small canning jars on hand.


Now....take 1 cup of water and bring it to a boil. You can either do this on your stove top or in the microwave. As soon as the water starts to boil remove water from the heat and add 4 envelopes of unflavored gelatin into the water and begin to stir to dissolve the gelatin thoroughly. While your gelatin is dissolving you can go ahead and add some food coloring to your empty jars as well as the essential oils or fragrance oils. I used only 2 drops of food coloring to each jar and added 2 small capfuls of fragrance in each jar. I used candle making fragrances that you can find anywhere online or at your local craft store.


Now pour 1 cup of cold water and 1 tablespoon of salt into your gelatin water mixture and stir. Pour into your jars of color and fragrance and stir carefully. They will foam a bit....not to worry it will disappear. I like to go ahead and refrigerate them to set them up a bit quicker. I added a frosty pink scent to my jars....hence the green tinting.  You can add a tulle or lace bit to the tops....tie some pretty ribbon around each one.....and viola'....and instant gift. Merry Christmas everyone....peace to you all!

Ellen

Sunday, December 18, 2011

Let it Snow Ornament

These sweet vintage ornaments are so cute and easy to assemble, you will want to make several.

Needed Supplies:
Small Vintage Album
Bits of Lace
Vintage Hymnal - Sheet Music
Buttons
Glue Gun
Glitter
Glitter Glue
Plastic Snowflakes
Exacto Knife
StazOn Black Ink
Tinsel Garland
Seam Binding
Vintage Mica Snowflakes
Cut album pages from vintage mini album.  (Save spine of album - pictured - for later use)
Trim sheet music to fit album page.

To make tinsel garland antique looking, ink up with Black StazOn ink pad.

Glue garland tinsel onto snowflake in a circle and add button in the center with hot glue gun.

Apply glitter glue to snowflake and add vintage mica snow (or extra glitter - as you can never have enough) to your snowflake.

To decorate album page add lace, buttons and snowflake.  Add hanger on back with seam binding and then glue sheet music into place on back to show through album page.


We all hope you are enjoying this Christmas Season.  We will be back this week with more tutorials for your holiday inspiration.


Saturday, December 17, 2011

shabby trees; a tutorial


hello friends! first of all, let me just say, THIS is the kind of gardening i can totally get into! i'm miss lynn, from create*breathe and i am so very pleased to be here with you! i love visiting the creative patch, and am grateful the girls asked me to share a little pretty!


the shabby trees project i'm sharing today can be constructed with supplies you most likely have on hand. as i was digging through my stash, i came across a copy of A Christmas Carol (totally my favorite Christmas story next to the one from Scripture) and was inspired to use it for my tree theme.


the tree of Christmas Past...


the tree of Christmas Present,


and the tree of Christmas Future.


each tree uses an empty cone shaped spool for its base.

the tree of Christmas Past, is covered in vintage crotchet lace.


i painted the spool an old fashioned pink and wrapped a layer of lace around the spool once and adhered it with hot glue. then i worked my way up till i was finished.


for a pretty garland to trim the tree, i used a strand of tatted loopies. ohmygoodness, don't you just love this stuff?!

i used white buttons and fake pearl beads for ornaments.


the topper is a teeny tiny frozen charlotte with pink foil angel wings. (i bought the wings from heather's shop years ago!) i stuck a glob of hot glue on the top of tree and added some shredded paper for extra shabbiness.


i covered a toilet paper roll with pages from the book, dipped the edge in glue and glitter, and set the tree upon the trunk. i liked the height it gave the tree.


the tree of Christmas Present used four yards of crepe paper.


cutting the paper into 18 inch strips, i folded the strip in half - the long skinny way - and stitched a basting stitch near the fold. then i was able to gather the paper and glue the strips right onto the spool. i used hot glue for instant adhesion.


the tree topper, vintage bingo pieces (2011 - get it?) glued onto a paper covered poker chip, are resting on crinkled paper. i used a phrase from the book, "my life upon this globe is very brief." (isn't that the truth?!?)


the trunk for this tree is also a toilet paper roll, i just shortened it so that the heights of each tree would be different.


and finally, the tree of Christmas Future, is created from one inch by two inch strips cut from the book. after each strip was glued onto the spool, i covered it with mod podge and glittered her up!


the tree topper is a vintage photo of an adorable baby named gladys. (or so it says on the back) she is adorned with wings cut from craft paper and glittered. i happened to have a piece of silver tinsel on my table that worked perfectly for the "nest".


and there you have it! three shabby trees for your holiday crafting and decorating!


thank you for letting me share a little ditty at the patch, friends! merry Christmas, and so, as tiny tim observed, "God bless us all, every one!"

Friday, December 16, 2011

Snowman Sauna Mug

Hello! Welcome to The Creative Patch! I am delighted to be today's Guest Gardner. My name is Jessica, and my blog home is Kids Napping? I'm Scrapping!

Snowman Sauna Tutorial


Today I will be sharing a tutorial for a versatile holiday gift: a Snowman Sauna Mug. This gift is a whimsical spin on the traditional mug and hot chocolate (or coffee) gift.

Snowman Sauna 2

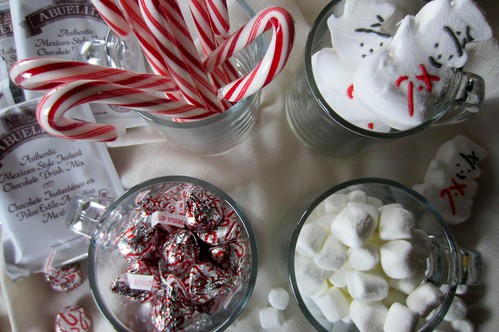
First gather your materials:
Glass mugs (mine were inexpensive at my local dollar store)
Snowman marshmallow Peeps
Marshmallows
Candy canes
Seasonal peppermint Kisses (my favorite!)
Your favorite hot chocolate mix (mine is Nestle's Abuelita's instant hot chocolate)

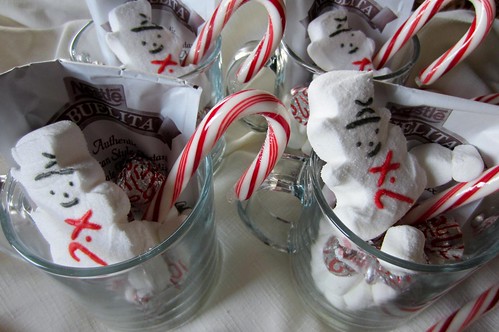
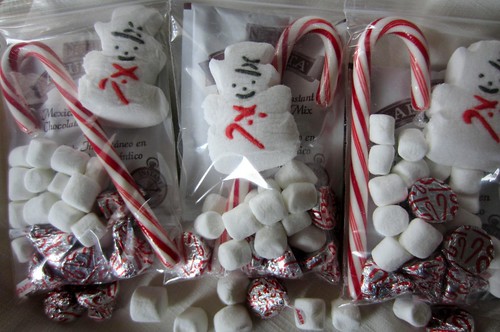
In each mug, place a hot chocolate mix, marshmallows, a candy cane, a few kisses, and one snowman marshmallow Peep.

Snowman Sauna 3

Attach the following instructions:
"Snowman Sauna:" In your “hot tub” add bubbly hot water and hot cocoa mix. Top with marshmallows, and then slip your snowman in for a warm, delicious bath! Sit back and enjoy.

Kids and adults alike are sure to appreciate this whimsical treat.

They would be fun as place settings at your next holiday party, as party favors, or as a gift for a neighbor or teacher.

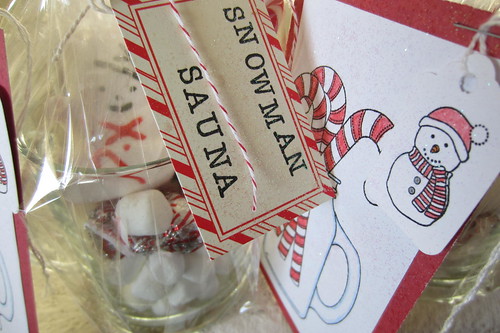
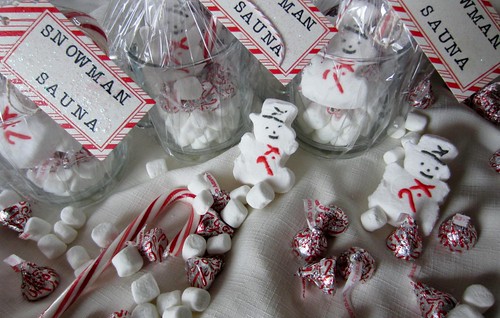
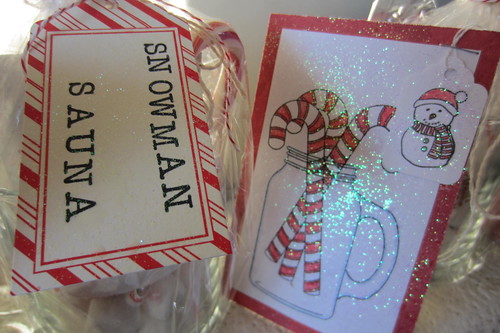
If opting to use one as as gift, you can wrap your Snowman Sauna with cello wrap, baker's twine or ribbon, and attach a stamped "Snowman Sauna" tag as I did for my daughters' teachers' holiday gifts this year.

Snowman Sauna 4

I also made a card using Papertrey Ink's Friendship Jar and Holiday Fillers stamp sets...
I pasted the Snowman Sauna instructions on the back.

Snowman Sauna 5

I also added plenty of glitter for sparkle!

Snowman Sauna 6

... You could also omit the mug, place the marshmallows, candy cane, kisses, and marshmallow snowman in a baggie with snowman instructions as festive gifts for your child's classmates.

Snowman Sauna 7

As a thank you for visiting today, I am giving away a Snowman Sauna Mug with one of my vintage Christmas tiny books.

Snowman Sauna Tutorial

Leave a comment on this post and I will draw a name on Monday, December 19th.

Happy, warm winter wishes to you!

Edit: 12/20
The winner of the Snowman Sauna Mug is Jen at
Jen's Unchartered Territory.


:)

Thursday, December 15, 2011

O, Christmas Tin!

Hello, friends!

Julie here...also known as "A Vintage Chic" in Blogland.   So glad Sheila asked me to pop in during the holidays to share a project with you!

I love creating things from vintage finds...


...this beautifully detailed muffin tin was a steal this summer at a yard sale--just 25 cents!  I really hesitated altering it, but....that's just what we do, isn't it, ladies?!


This was very simple project, really.  First, I just looked online for some wonderfully retro Christmas images (thank-you, Pinterest!), traced the bottom of one of the cups, and used that pattern to cut out each image...

After deciding where I wanted to place each image in the tin (using just a touch of glue for each), I circled the images with some Platinum Stickles (just about my favorite product on the planet!), softened the edges a bit with a fine paintbrush--blurring it onto the image a bit more--and that was it for the images!


I decided it needed just a little something more...snow, of course!  A little dimensional white paint was added under each cup, and then some fine iridescent glitter was sprinkled on top--just the right amount of sparkle!


For the center, I adhered an wonderfully shabby vintage light reflector I found in a box of old Christmas ornaments I picked up at another yard sale this year, topped it with a button, and the "Merry Christmas" sentiment typed up using a vintage typewriter font.


Some lovely seam binding was dyed with Glimmer Mist in two different shades of green, then tied in a big, loopy bow and attached to the top of the tin--then crowned by two wonderful vintage buttons from my stash...


...a few more vintage plastic buttons (don't you just LOVE them?!) were added to the bottom, and that was it!  Easy peasy!


So fun to make your very own "vintage" Christmas touches for the home...hope you'll give it a try!

Wishing you all the merriest Christmas of all!

Julie