Pages

Monday, October 31, 2011

Witching You a Happy Halloween

From all of us at The Creative Patch.

Join us in November as we welcome new Guest Gardener, and my sweet friend, Traci Thorson.   She is a spectacular photographer and creative soul and I can't wait to see what she has in store for us.

My dear friend, Leah, will be back with us again to share her creative tutorials.  Her creative talents continue to inspire me. 

Then Sarah, Heather and myself will be featuring November kits of the month on November 6th to inspire you and more creative tutorials, Trash to Treasure, Kid's Corner Tutorials and more.

Happy Hauntings,

Sheila


Saturday, October 29, 2011

Autumn Blessings Download

Our gift to you...
Click on the image and then save.

Wishing you bountiful autumn blessings.

Sheila


Wednesday, October 26, 2011

Autumn Apple Crisp

Living in New England, apples are a major part of our autumn meals.
Here is a recipe for our favorite seasonal treat, Apple Crisp.
For the filling:
10-12 large apples, peeled and sliced (Cortlands are our favorite)
3/4 cup white sugar
1 tablespoon flour
1 teaspoon ground cinnamon

For the crumb topping:
1 cup quick oats
1 cup flour
1 cup packed light brown sugar
1/4 teaspoon baking powder
1/4 teaspoon baking soda
1/2 teaspoon ground cinnamon
1/2 cup melted butter
  1. Preheat oven to 350 degrees F.  Lightly grease a 9x13 inch pan.
  2. Place the sliced apples in the pan. In a small bowl, mix the white sugar, 1 tablespoon flour and 1 tsp cinnamon together.  Sprinkle over apples, then stir carefully to coat the apples.
  3. In a bowl, combine the oats, 1 cup flour, brown sugar, baking powder, baking soda, 1/2 tsp cinnamon, and melted butter together. Crumble evenly over the apple mixture.
  4. Bake at 350 degrees F for about 45 minutes, until apples are soft and topping is golden brown.  Serve warm with vanilla ice cream.
Original recipe from here, just slightly adapted.

Monday, October 24, 2011

Hocus Pocus

With a  little bit of magic {aka creativity}, you can turn a book cover into some spooky-sweet Halloween decor.   Grab yourself an old book, a few embellishments, and you'll see it's really no trick at all to make.
Supplies needed {not all shown}: front/back cover removed from an old book, wire & wire cutters, crop-a-dile hole punch, glue gun & glue sticks, burlap, tulle & ribbons, glitter, 3 glass vials {I got mine on etsy}, inks & glimmer mist, sandpaper, letter stickers, a bingo card, and assorted embellishments to fit your theme.

The first thing I did was take a little sandpaper to the book cover and inked it a bit because I like the distressed look.  Then, I punched two holes near the top and attached some wire.
I chose a bingo card {Tattered Angels product} as the base for my "art", so first I inked the edges and sprayed it with some glimmer mist.  Next, adhere the burlap to the card.  You can glue it or sew it on to the card.
{I cheated...since I don't sew...Sheila was kind enough to stitch the piece of burlap for me}
After that, I poured some glitter into all three glass vials. {The ones I found came with cork stoppers but you could "close" the open end with buttons glued on top or wrap them with paper & thread.}
Then, I glued the glass tubes on top of the swatch of burlap. You may want to use a stronger adhesive for the glass; if so, let them dry before going on to the next step.
Next, wrap the whole thing with tulle and/or ribbon.  Add a pretty pin if you'd like.  Using a glue gun, adhere the wrapped bingo card to the book cover.
Now it's time to add a word or phrase and some embellishments. 
I glued a fabric flower near the top of my card
and spelled out "hocus pocus" with some letter stickers near the bottom. I added an image to a bottlecap and glued that in place of the letter "o" in "pocus".
For a final touch, I added another bottlecap with ribbon, an old domino{wrapped with wire} and some tulle to the wire hanger. 
And there you have it...
a quick little treat just in time for Halloween.
I hope you'll have some fun creating a bit of your own "magic"!


Wednesday, October 19, 2011

Frosted Pumpkins

Add a little frosty bling to your mini pumpkins this fall season.

By gathering a few simple supplies and following these easy instructions, you will have a whole patch of frosted pumpkins in no time at all.
 
Supplies:
German Glass Glitter
(you may substitute regular silver glitter, but there nothing like using the "real" thing)
Glitter Glue
Mini Boo Pumpkins

 Apply glitter glue to the top of the pumpkins where you want the "frost" to adhere. 
 Sprinkle German Glass Glitter over glue - shake off onto a piece of paper so you can funnel the glitter back in the jar.
Allow to dry.
These frosty pumpkins are a sweet reminder of crisp, cool, frosty mornings. Place your frosted pumpkins in your fall vignettes to add a bit of bling or put a bunch of frosted pumpkins in a stoneware bowl for a punch of creamy frosted goodness. 
For a Halloween twist to the frosty mini pumpkins, add eyes, nose and mouth with glue then sprinkle with glitter to a bling your small jack-o-lantern.

Hope you find some time to add a little sparkle and frost to your fall decor.

Hope to see you on Monday, Oct 24th as Leah joins us as a Guest Gardener! 
See you then!

Sheila


Wednesday, October 12, 2011

Trash to Treasure - Wishing on a Star

After the death of my beloved grandma over a year ago, we were going through her kitchen when I happened on some old tarnished silverware.  If it were left up to my husband these would have definitely hit the trash, but since he was no where in sight the hit my bag to go home.
Supplies Needed:

10 Pieces of Old Silverware
A combinations of knives, forks, spoons and/or butter knives
E6000
Clothespins (not pictured)
Position your silverware to form a star.
I tried to let the silverware patterns show as much as possible as I laid out my design.  Then glue each piece together.  Use clothespins to hold securely until dried. Let dry completely.
Once dry you can hang your star up.

Wishing you all a creative day.  Come back soon for more fun tutorials!

Sheila


Monday, October 10, 2011

Vintage Spoon Spider Ornaments

I recently picked up a few vintage spoons while out junkin’.  They had nice tarnishing and pretty handles.  I didn’t really have a plan for them, until I realized that I needed to make some Halloween ornaments for a swap.  For some reason, spoon spiders came to mind!  Here’s how I made them!

Tools and supplies:
Goggles
Vintage spoons
Hammer
Sharpie marker
Drill and small drill bit
Dremel or metal file
Wire
Wire cutter
Small pliers
Flat glass pebbles
Beads with holes that fits snugly on the wire
E6000 Glue
Ribbon

 Instructions:
***Wear eye protection!***
Use the hammer to flatten the spoon.  
(There are several tutorials online.  I just hammered the spoons on a wood plank.)
Decide where you would like the legs to be and mark with the Sharpie.
Drill holes on marks.
(Be careful ~ the spoon may get hot from the drilling.) 
Smooth the holes with the Dremel/file.
Use pliers or a vice to fold over the handle of the spoon to the back.
Cut the wire for the legs.
Decide the length of wire that you would like for each leg, and add 1 inch.
(You will need one piece of wire for each leg.)
Insert wire in leg hole about  .75” through the back and bend the wire in half.
Wrap the wire around itself using pliers.  Twist tightly to secure.
Bend legs as desired.
Repeat for each leg.
  In a well-ventilated area, dip the very end of each leg into the E6000 glue and add a bead.
Repeat with all legs.
Glue the glass pebble to desired spot for the head.
Let dry for a day then add a ribbon hanger.

Monday, October 3, 2011

October's - Exclusive Kits

We are so excited to be offering exclusive kits blooming with inspiration
 from Sarah, Heather and myself...

Sarah is offering these fun Sweet or Scary Kits that is sure to please everyone...


Celebrate your scary or sweet side with this fun earring kit.  Each kit comes with two howlite skull beads come with either pink or gray flower cabs, sterling silver ear wires, sterling silver ball head pins and sterling silver spacers.  These earrings are perfect for Halloween or Dia de los Muertos, will be sure to get lots of notice each time you wear them.  This kit is an easy mommy and me project to teach your little one basic jewelry techniques or perhaps you want to make an easy handmade gift to someone special in your life.  All you need is to provide a good strong glue, such as E-6000, round nose jewelry pliers and cutters or a nail clipper.


Heather gathered together a delightfully spooky Midnight Kit to let your create some goulish goodies just in time for Hallowen.

 A collection of mainly vintage artsy goodies in shades of black and cream.  This kit would be fabulous for Halloween projects, yet versatile enough for any vintage-inspired crafting. 

 Includes:
Over 3 yards of new and vintage lace and trim
2 larger lace scraps
3 yards of vintage seam binding
A collection of vintage stones, cabochons, and embellishments in glass and plastic
A collection of paper ephemera including an antique ledger page, sheet music page, and vintage dictionary pages
Two antique photographs/cabinet cards  (These will vary from the photo.)
Vintage BINGO card and wooden call numbers
Charcoal gray mica flakes
And more!
  
Available at Speckled Egg

I enjoyed putting this one of a kind kit, The Witching Hour together.

 Witching Hour Kit
Includes:

Vintage Whisk Broom
Vintage Key
Hand Dyed Cheese Cloth & Wool Pieces
Bat Lace
Sweet Halloween Image Transferred to Osenberg
Fabric Leaf
Black floss
Vintage Black Button
Witching Hour Tag
Please Note: Due to vintage items used , kit contents may be slightly different than pictured.
You can order your Witching Hour kit here....

We all have enjoyed creating exclusive kits for you this month.  Limited kits are available, so order them now.

Thank you so much for all the wonderful heartfelt and encouraging comments about our new creative blog.  Please know that we have read each one and though we may not have been able to get back with you all, each comment means so much to each of us.

Now here are a list of the Winners for the Giveaway picked by Random Number Generator:

Speckled Egg Giveaway Gift Certificate

#4 
Kai said...
WELCOME to BLOGLAND! I was so excited when I saw what Heather had written about Creative Patch! GREAT IDEA! And goodness knows, I can USE some tutorials! THANK YOU!

Blessed and Distressed Giveaway
#23
jengd said...
I have your button: http://jensunchartedterritory.blogspot.com/

My So Called Junky Life Gift Certificate
#54
Cecily said...
I am so excited for the new blog. I love a good creative blog that will help to inspire me!
I will be contacting each of the winners today.
Thank you all again for playing.  

Be back soon as we have more tutorials, Trash to Treasure, Kid's Corner and Digital Downloads coming!  See you in The Creative Patch!!

Sheila, Heather & Sarah


Saturday, October 1, 2011

Welcome, Boo Bucket Tutorial and Giveaways

 
I am so excited that the day has finally arrived to kick off The Creative Patch!  Heather of Speckled Egg, Sarah of My So Called Junky Life and I have been working hard to bring you inspirational tutorials, digital downloads, kid’s corner, trash to treasure feature and special kits to help your creativity bloom.  We are excited to have Leah of Family Matters and Everyday Chatter, join us this month as our special Guest Gardener.
Do you have a special treat to share with your ghoulish goblin?  That special treat would look delightfully creepy in these cute Boo Buckets.  So simple and easy to assemble that you will want to make a lot of these Boo Buckets for all your little ghosts.
Supplies Needed:
Peat Pots
Burlap
Wire
Buttons
Glitter - Various Colors
Black Paint
Black Ink
Glitter Glue
Glue Sticks
Wire
Ribbon
Various Pattern Paper
Scalloped Circle Punch
Plastic Spider Rings

Dry brush black paint on burlap.  Let dry and adhere painted burlap and ribbon to pot.
Cut 2 strips of 1 1/4" x 12" Pattern Paper - and accordion fold each approximately 1/4".
Edge with black ink if wanted.

Adhere together to form circle.
 Push center down and adhere circle punch on front and back to hold pinwheel in place.
 Edge scalloped circle with glitter glue and add German Glass Glitter for a vintage look.  Add tulle if wanted.

 Using spider and assorted plastic rings for a fun accent on your boo buckets.
Add glitter glue to rings.
 Dip ring into glitter.  Once glue is dry cut off ring and adhere to boo bucket.
For handles use wire and punch hole through sides and wrap back around handles.  Using buttons and ribbon as accents on the wire.

You'll want to make all your little pumpkins these fun and easy buckets to fill up with yummy goodies.

Have fun creating!

And now for more fun....


We all joined together to offer 3 wonderful giveaways


Heather is offering...


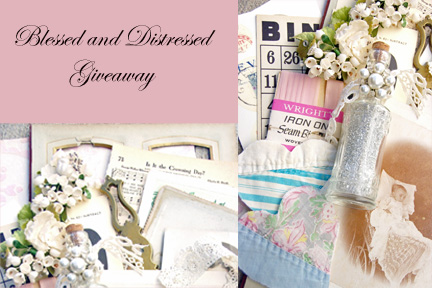
I am offering some vintage goodies, including ephemera, vintage lace, vintage photo album pages, buttons, vintage millinery and a bottle of German Glass Glitter.
Sarah is offering....
ENTER TO WIN:
You will have until midnight on October 5th to enter. 

You will have three chances to win.
1.  Leave a comment here
2. Leave a second comment here letting us know that you added The Creative Patch button to your blog.
3. Leave a third comment here if you are a follower.  You won't want to miss all the tutorials, trash to treasure features, kid's corner, digital downloads and exclusive kits... so stay tuned by following.

It is that simple!  This giveaway is open to US bloggers only. Sorry!
 If you don't have a blog be sure to leave your email. 

Be on the lookout between now and Oct 6th for another creative tutorial.

Come back on October 6th as we announce our 3 winners
AND
we will be bring you some exclusive kits to help your creativity bloom.

See you soon here at The Creative Patch.

Sheila